

Alexander Grabovetskiy, woodcarver, School of Woodcarving · Published 2022
How do you fill the empty spaces in a carved panel?
Quick answer: Filling empty space on a carved panel is mostly a job for filler flowers, small and simple blooms tucked between the main shapes. Gibbons put them almost everywhere on the panel we copied in my Maine class, darker spots included, and I gave each one 5/8 inch to 1 inch wide.
Filling the empty spaces in a carved panel is the job of filler flowers. They are small, simple blooms set in between the main flowers, leaves and stems. In my second Maine class we looked closely at a picture of the Grinling Gibbons original, and he had used them everywhere. Even down in the darker spots.
Have you looked at an old carved panel up close? Did it look full? On the Gibbons piece we copied, those little flowers fill nearly every gap. You will see how big I asked the class to draw them, why I count them, and how the dark spots behind them get opened with nothing but a gouge.

Filler flowers in five lines
- Gibbons put filler flowers all over this panel, down into the darker spots behind the big shapes.
- Each one ran from five eighths of an inch to an inch across in class, and none of them tiny.
- I want the count on a Fibonacci number. Nobody will see it, but it would bug me.
- Black marker on the drawing means deep excavation, and those spots get carved first.
- A plug cut with a 10 mm number 9 opens a deep spot quicker than a scroll saw.
Why did Gibbons put filler flowers everywhere?
Most likely he did not know what else to put there. That was my guess in class while we looked at his picture together: just because he didn't know what to put, most likely he decided to put some filler flowers. So we did exactly that, and the empty section on our drawing got filled with filler flowers too.
Look closely and they are right underneath the bigger shapes. They go right in and fill the space, even in the darker spots, and behind the main group it is full of flowers. I told the students I was not sure they could see them all. You should be able to.

The lower part told the same story. Down there he has a couple of smaller tulips and a bunch of strange looking leaves. Lots of stems, too, and mostly, again, he uses filler flowers everywhere. We were going to do exactly the same there.
Other carvers do it too. In Maine class 17 I told the group the filler flower is common among wood carvers throughout the world, so when you have a space, you fill it with the same type of flower, a somewhat simple one. My furniture panel design course puts it shorter. The filler flower is exactly like its name, because it fills the space. They used those flowers when they sometimes didn't know what to do with an area, and in my opinion they look really good.

How big should a filler flower be?
About 5/8 of an inch to 1 inch across, which is roughly 16 to 25 mm. In class it came out the way I talk, about three quarters of an inch (19 mm), 1 inch, 5/8 of an inch. Then one short rule. Don't make them too small.
Their sizes should not match each other, either. I said it plainly in my design course, where I never put the same size. Take a 20 mm flower, three quarters of an inch. One of them is 20 mm, another one is smaller, another one even smaller, and they never repeat the size.

Should a filler flower get a lot of detail?
Keep it really simple. When we reached the filler flowers in Maine class 4, I said exactly that: really simple, don't overcomplicate, most of it is going to be hidden. You won't really see them.
The second layer goes on over them later, and you will still be able to reach in, undercut and refine. So please don't overdo it. That would be a big mistake. Why the flowers should connect rather than sit apart is the question of Maine class 3.
On paper they stay simple too. In the furniture panel drawing lesson I drew them as a cluster of simple flowers with really small, tiny leaves, then went over them with a softer 4B pencil. Maine class 12 even has a bigger filler flower on the upper level, hidden underneath a parsley leaf.

How many filler flowers go on one panel?
I want the total on a Fibonacci number. Later on, once we carve, I want to make sure of it, and I said why. Even if you're not going to see it, it's going to bug me if it's not.
One section of our drawing bothered me before we even counted. He had a lot more of them in that spot, so I wanted to do whatever he did there and put them in. They won't be the same, though, I added. Then we counted, and the recording catches it: "So you get about 15 filler flowers? Not enough. Oh, no, it's more."
Each number in the sequence is the sum of the two before it, so it runs 1, 1, 2, 3, 5, 8, 13, 21 and on. Wikipedia's page on the Fibonacci sequence says Leonardo of Pisa brought it to Western Europe in 1202. The same page finds the numbers in plants, like the arrangement of leaves on a stem, though not in every species.
Lesson 3 of that design course gives the sequence its own part, starting with one plus one. Later in that course I take the count one step further. Five flowers or eight, it doesn't matter, I consider the group a single element. I repeat that element somewhere else, but on that side it is not eight, it is five, and the size is a little different. It creates the depth.

What else fills the ground besides flowers?
Leaves do much of it, and so do stems. The first layer has a few parsley leaves, maybe some kind of acanthus slash parsley or something like that, a bunch of flowers, and two flowers that face down. How a parsley leaf differs from an acanthus leaf has its own page, Maine class 14.
One little flower on the second block I couldn't even name, and it wasn't the tulip. It doesn't really matter. You can name it anything.
One section has a couple of stems, and one of them is a hidden stem. I don't want to lose them. Around them the wood gets somewhat excavated. How to undercut a stem so light shows behind it is Maine class 5.

What does black mean on the drawing?
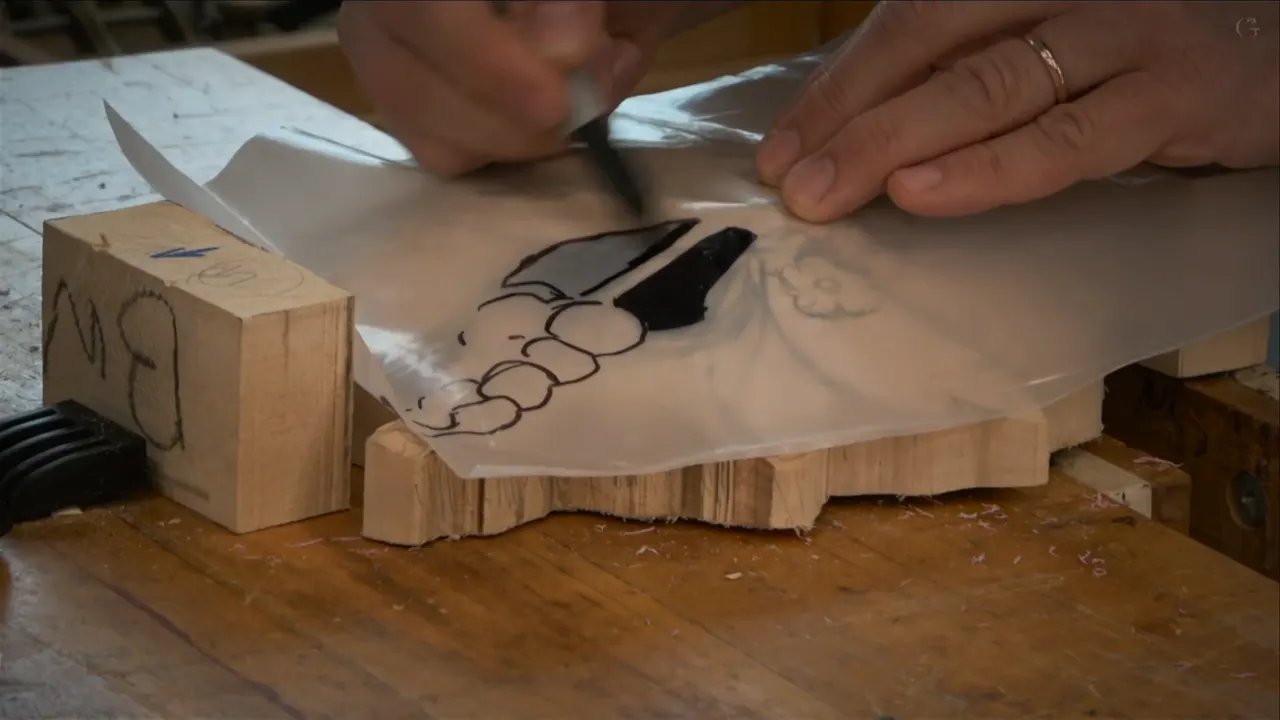
Black means deep excavation. Really deep. Please understand the black area, I asked them, and I filled those spots in with a dark marker on the plastic.
I didn't reach the edge with it, because I didn't have any more plastic. You don't really have to go all the way to the edge anyway.
Those deep spots come first. Let's concentrate first on excavating those deep spots, I said, they are really important, and then we jump on the details.

How do you open the deep spots without a scroll saw?
With a plug cut. One way is to take the piece to the scroll saw and scroll it out, and that is the easy way. On a piece this size it is possible, but think about carving a huge piece. How are you going to scroll that?
Today you can buy a fine blade and put it in a frame saw. In the 18th century they did not have those blades, so how would they attack those areas? You can drill it, and here you probably could, but sometimes a drill is impossible because of the movements around it.
Say you have only gouges and a workbench, like a true woodcarver. You take a gouge. I call that type of cut a plug cut, because you remove plugs. Place it right in the middle of the area you have to excavate, start the movement in both directions, and the plug comes out.
Once the plug is out, there is no need to go too deep. I had maybe half an inch (13 mm), and then I could carve toward that plug. My tool was a number 9, 10 mm, which is 3/8 inch.

It's actually quicker than any scroll saw. Keep digging and a couple of minutes later you are all the way through. I wouldn't go through right away, though, because the workbench is under it, so I go about 7/8 of the way on each hole and leave it.
Later, once we work on the back side, you can reach that hole from behind. Being exactly in the hole doesn't matter. You could use a drill press, sure, but you have to walk to it and set your bit and so on. Getting to the gouge and digging took me only about a minute. Any hand tool works too, even a hand drill.
On one hole I kept going until I was through. My scrolling is done, I told them. See the hole. One gouge I picked up for a tight spot needed sharpening, by the way.

| Job | Tool | Depth | Note |
|---|---|---|---|
| Plug cut holes | number 9 gouge, 10 mm, 3/8 inch | about 7/8 | then reach the hole from behind |
| Back side hollow | gouge held low, other hand on board | half inch | no more than that, only preliminary |
| Black marker areas | dark marker filled in on garden plastic | really deep | black on plastic marks deep excavation |
| Filler flower size | drawn on plastic, then carbon paper, traced | 16-25 mm | from 5/8 to 1 inch across |
| Tulip high spot | surface left alone, one inch around it | full height | main guy stays high for now |
What happens behind the second layer?
A hollow, so it can sit right on top of the first layer. Lay the two pieces side by side, eyeball where they are supposed to fall, and the overlap is the spot you excavate on the back. Mine went no more than about half an inch.
Don't spoon it. Hold the gouge too high and travel inside, and you get a really deep spoon instead of a nice transition, and that makes a big problem later on. Keep it gradual, a little by little. You don't have to remove a lot of material at once.
If you are right handed, your left hand stays solidly on the board, and you don't raise both hands in the air. That is how you control it. The stroke itself is a rotation, and when pushing forward starts to dig deeper, attack from the opposite direction and clean it.

Then flip the piece and dome the front, the same as on the first layer. Find the high spots first. My main guy is a tulip, and I want it as high as possible, so its surface stays untouchable for now, with about one inch around it left alone too.
The layers do not need to touch everywhere. We don't really need a huge gluing spot. As long as a couple of spots touch each other, it will be good. The true fitting comes later, and this is only the preliminary pass.

What do you draw the filler flowers on?
True garden plastic, the stuff they use to keep the weeds down. Wikipedia's page on plastic mulch describes that kind of sheeting. If you buy it, don't be cheap and don't buy a really thin one. I paid, I don't know, 10 bucks for mine, a big roll, and it's going to last me a lifetime.
Keep an eye on painter's plastic. Sometimes it is too thin, and then it's really hard to transfer anything.

Three points on a shape mean it goes up. I drew the dots, then wrote the word up beside them as well. I didn't put too many details on it. Things were just positioned approximately. Why I like the plastic in the first place is where Maine class 1 begins.
How does the drawing get onto the wood?
With carbon paper. Take a carbon paper and trace it. Some people do it themselves instead and draw right on the piece, and that works too.
A transfer that is not quite accurate is absolutely fine. It's not about getting the line exactly in position, because we can move it around with the gouges later.

Did I carve them the same way Gibbons did?
Not quite. In class 17, with my piece almost done, it had them on this side, on that side, and some right there, four bunches in all. I used the idea of the filler flowers, but a little different idea. I elaborated, and I think it looks a little better.
Of course, nobody has to do it my way, and you can copy exactly what Gibbons did.
And if somebody tells you the design doesn't look nice, keep in mind whose design it is. We were working on his original, so just say blame the guy. I'm not the one.
Wikipedia calls Grinling Gibbons an Anglo-Dutch sculptor and wood carver, known for work at Windsor Castle, Hampton Court Palace and St Paul's Cathedral. The V&A in London keeps a collection page on him.
The plug cut, the plastic and the filler flowers all come from Maine class 2, one of eighteen classes in the Grinling Gibbons course, with a final assessment at the end. The full class videos open with Tuition.
How it's done
- Study the original for filler flowers. Look at the picture closely, even the darker spots and the space right underneath the big shapes.
- Draw on true garden plastic. Skip the thin sheets. Three dots on a shape mean it goes up, so write the word beside them too.
- Keep them between 5/8 and 1 inch. Don't make them too small, and keep each one simple.
- Count them. Settle the total on a Fibonacci number such as 13 or 21. Even if nobody sees it, it would bug me to be off.
- Fill the deep spots with black. Every area that gets deep excavation goes dark with the marker, and those spots get carved before any detail.
- Trace it with carbon paper. Close is good enough here. The gouges will move the line around later.
- Open the black spots with plug cuts. A number 9 at 10 mm goes in the middle and turns both ways. Stop short of the bench and finish from the back.
Frequently asked questions
Do all filler flowers on a panel have to match?
Mine never do. My course on design principles says I never put the same size, so out of three flowers of about 20 mm, one stays 20 mm, the next is smaller and the last smaller still. For the Maine panel my words were "they're not going to be the same."
Can you make a hole in a carving without a drill?
A gouge alone does it. I used a plug cut with a number 9 at 10 mm, set in the middle of the area and turned both ways until the plug lifted out. Stop around 7/8 of the way because the bench sits under the work, then come through from the back later.
What kind of plastic works for tracing a carving pattern?
Heavy garden plastic, the kind used to keep weeds down. Painter's plastic is sometimes too thin, and a thin sheet makes the transfer really hard. Mine was a big roll for about 10 bucks, and I expect it to last me a lifetime.
What to carve next