

Alexander Grabovetskiy, woodcarver, School of Woodcarving · Published 2022
Why is there a tulip in a Grinling Gibbons carving?
Quick answer: The tulip in a Grinling Gibbons carving is the main idea of the design and its highest spot. In class 7 of my Maine course I said Gibbons was probably showing off that he was born in Holland, where people love tulips. Everything else on our copy sits lower than it.
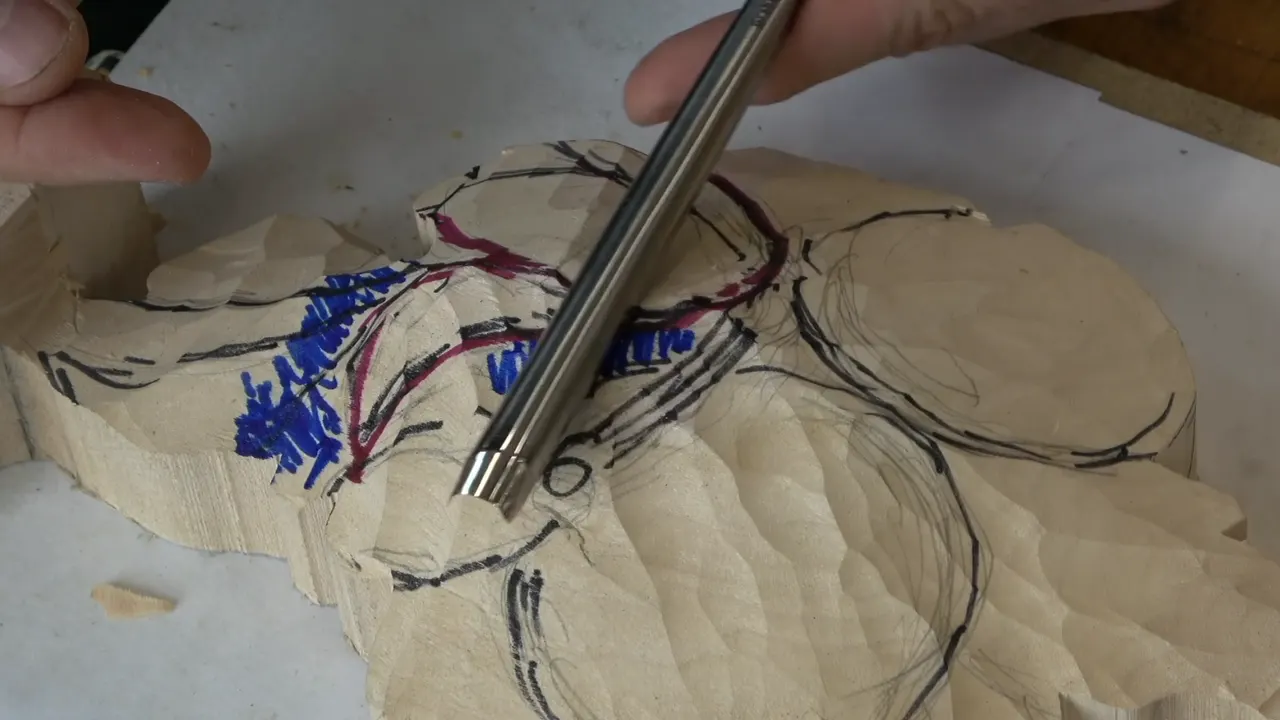
The tulip on this Gibbons panel is the main idea of the whole design, and the highest spot on it. I said so in class 7 of the Grinling Gibbons course we recorded live with students in Maine, the day I outlined it and rolled it round. Why put a tulip there at all? My answer in class had to do with Holland.
Ever rounded a carved flower and watched it go flat on you, like a pancake? Want one flower on your panel to stand higher than everything around it? Class 7 went to exactly that, on one tulip, with a number 9, a number 2 and a spoon.
You will get what I said about Gibbons, the depths I gave, and every tool I picked up for that flower.

Class 7 and the tulip, in six lines
- On our copy of his design, the tulip is the main idea and the highest spot.
- Gibbons was born in Holland, a country that loves tulips, I said.
- A 10 mm number 9 outlined it, and the ground beside it went down roughly 6 mm (1/4 in).
- A number 2 rolled it round, chamfer by chamfer, so it would not go flat.
- One petal flips over, and a spoon opens the shadow underneath it.
- Two shallow concaves from a number 7, 14 mm wide, run inside that petal to its point.
Why did Gibbons carve a tulip on this panel?
He was probably showing off where he was born. That's my reading, and I said it with a probably, right while I outlined the flower. That place was Holland, and Holland people love tulips, especially, I told everyone. We're talking about the 17th century, the 18th century. It was a big deal, and it still is.
Wikipedia gives a little more. It calls Grinling Gibbons an Anglo-Dutch sculptor and wood carver, born in Rotterdam in 1648 to English parents, who moved to England around 1667.
There's a page there on tulip mania, too. That was a stretch of the Dutch Golden Age when contract prices for some tulip bulbs ran extraordinarily high. It sped up in 1634 and fell apart in February 1637. At the peak, it says, certain bulbs sold for more than ten times the yearly income of a skilled worker, and the Semper Augustus was the most expensive one. So the crash came eleven years before Gibbons was born.
What he had in mind, nobody can say for sure. Nobody actually had the chance to talk to the guy, I said later, in class 11. What I know comes from books. I've got multiple books about Gibbons, some of them antique, and I read a lot about him.
What does the main idea mean on a carved panel?
One main guy, and everything else supports it. On our copy of his design, that guy is the tulip. Twice in a row in class 7 I said the tulip is the highest spot, and that it's the main idea.
Right after, I made a joke of it. Doesn't matter what other flowers think, I said, the tulip is still the main idea.

The rule is older than this class. Back in class 1 I reminded the room that there is supposed to be only one main guy. During class 2, when we started to dome the second layer, I said my main guy would be right there, a tulip. For me the most important thing was to keep the tulip, and not touch too much from its surface yet. I outlined it in class 7.
Which tool outlines the tulip?
The same one as before, a number 9 at 10 mm (3/8 in). I went round the tulip first, since it's the main idea overall.
Everything around it gets lower. I dropped that area to about a quarter inch (6 mm), and told them the whole thing would just be sloping down.

You know what, I said then. Let's outline those two guys right away too, while we have that tool in our hands. We won't waste any time that way. I grabbed a bigger one, too, because I didn't want to use a small tool there, and I dropped a leaf there to a quarter inch as well.
Later in the class I said the same thing about tools in general. The bigger tool you have, the better it is to use it right away.
Should you draw on carving wood with a marker?
Don't use markers, I told the class in Maine. I just use that for you. If you're going to use a marker, look at your hands. And it's permanent.

I say it in other courses too. In the Byzantine acanthus course, lesson 4, it came out like this. Please don't use markers. I use that only for the purpose of showing up, because it's really hard to get rid of.
In Venice Room workshop 97 I said it about my own panel. Man, I shouldn't use the blue permanent marker. It's really deep.
So what do I draw with instead? For the dining table apron I drew with architectural colored pens. They're made for paper, so they don't bleed through it, and that means they don't go deep inside the wood grain. I used Sharpie before, too.
How do you carve a tulip round instead of flat?
My number 2 does it. That's the flatter tool, rolled chamfer by chamfer, and before I started I told everyone what we are after. We want the true 3D shape of that tulip, going really round, all around. Picture the real flower inside your head, I said, and it's going to help you.
I went straight down first, at the beginning.

Then I started my rolling motion with the number 2, making many small chamfers, one beside the next. I really want to make sure it looks roundy, I said.

In class 6, one class earlier, I called the tulip itself not that complicated a thing. The only thing with the tulip is that you really have to see it's just like a barrel that goes around.

What happens if a carved tulip comes out flat?
Like a pancake. That's the spot you can't mess up, I told them. You can make it too flat. And it'll look really bad, so really make sure you understand the roundness, going around the whole way.
Even where I drew a petal on top, I said, that petal goes somewhere on the side. Can you see that roundness I created? That roundness is supposed to be there on every one of the sides, I said.

How deep does the stem meet the tulip?
About 1/2 inch (13 mm) for now, at a spot I dropped beside the tulip for my stem to connect. There are going to be two stems there, I said. One crosses, and the flowers develop from it, growing from somewhere underneath. The other one connects to the tulip.
Later on the tulip itself may go a little deeper, so I held back. You have to consider how wide it is. Ours is about an inch and a half (38 mm), which means the final connecting point lands near three quarters of an inch (19 mm), right in the middle of the back side of the tulip. For now I took only half an inch of it and left about a quarter for later development.

Why take the two triangles out so early?
You won't lose the movement that way. Once the tulip is round, a couple of spots come out right away, this triangle and that triangle, I said. That way you're not going to lose a sense of the movement. I know it doesn't make sense at the beginning, but it will.
My first pass there was with the nine again, and I said sorry for not naming it sooner, number nine and 10 millimeters. After it came a number 11 at 3 mm, to get even more inside those triangles.

Next I put in a preliminary line where one petal reaches toward the center, and made a preliminary pass with my flute at about 11 o'clock. It could be 12 o'clock, I added, because this petal goes on top of that one. My number 2 blended it right underneath, and a number 3 would work too.
On the opposite side the petal sits somewhat below. So the same 3 mm eleven went straight up with the flute at 12 o'clock, not more than a couple of millimeters deep.
How does a carved petal flip over?
You excavate inside it, and the petal turns over on itself. It's hard to explain, I told the class, and it's going to look really interesting.
Early in the second part I said we would not undercut yet. Later on, I said, we'd take a smaller tool, like 1 millimeter, and undercut underneath this petal, but for now I really wanted to see the petal develop. First the nine excavated the area where the flipping will happen, as a preliminary pass.

Be really careful there, I said. I'm going across the grain, and if I force it, I'm going to break it. Now it's the time to get a spoon. I believe yours is a 10 mm number 9, I told them. Mine was a number 11, a veiner, 7 mm.
This flower is really important, I said as I spooned out under it. That detail makes the whole world of a difference. See how deep a shadow it creates.

By then I was approximately an inch (25 mm) down from that point already. I'd work a little bit ahead of everyone, I said, so they would see the later result.
Then I showed them the next development right away. A petal right on the side gets excavated too, because it is part of what you see inside. I took my spoon to it, carefully, carefully, right underneath. The whole petal is going to be released, I said, and we're going to release it from the jail.

Where the flip starts, you can exaggerate it with the spoon, but be careful what direction you work in. My thumb was my leverage point, and my middle finger held the other side. And don't cut yourself, I added. Be really careful. That gives me a shadow also. The edge there has to be blended too, and the side of my tool can do it.
In the last part of the class I said we really need to start undercutting there right away, before it's too late. Back came the 10 mm nine, with my flute at about three o'clock. Which way petals overlap gets its own page from class 8, and undercutting a stem gets one from class 5.
What goes inside a carved petal?
Shallow concaves. Inside that petal I don't want to see a flat spot, I told them, or just a convex. So I made a couple of concaves. Not deep ones, but they go all the way to the point, and they look much more interesting.
The tool was a number 7 at 14 mm (about 9/16 in). Why do it? I want to see more shadows, I said. One bigger concave came next, right to the edge, and I carried it down pretty much the whole way.

You still don't want a sharp ridge between them, so I blended it away with my half inch number 2 (13 mm). Can you see how nice a finish it gives me? I asked. After that, you really don't need to sand anything.
With the same tool upside down I shaped the edge of that petal, and got a really sharp edge.
Where does a knife edge on a petal come from?
From inside the opening. I cleaned the plug cut with the number 9 at 10 mm upside down, and took my pass right to the edge. That way I'm undercutting, pretty much, and making a really sharp edge on the petal, like a knife edge.
And you're slicing it, I said, you don't push it. You can attack it from all the sides. Unfortunately I couldn't show that one on camera, because it's inside the flower.

Earlier I had warned them about the dome underneath. If you go all the way through, I said, you just see some of the lower level, which is actually okay. Right after, I told them to go deeper at the front, where we did the plug cut, maybe about an inch (25 mm) deep, and to work toward that hole, coming in off the sides.
The inside petals get the same shape you carve outside, I reminded them. They also have to be points.
| Step | Tool and size | Why |
|---|---|---|
| Go round the tulip | Number 9, 10 mm, same as before | Main idea |
| Roll it round | My flatter number 2, in small chamfers | No pancake |
| Clear the triangles | The nine first, then a 3 mm eleven | Keep the movement |
| Flip one petal | Spoon, my number 11 veiner at 7 mm | Deep shadow |
| Hollow that petal | Number 7 at 14 mm, two concaves | More shadows |
| Sharpen its edge | Same 10 mm nine, held upside down | Knife edge |
Why turn the panel as you work?
Holding it one way wasn't convenient for me, I said, so I turned it. There's a lower level to the tulip too. The other petal down there gets some divisions of its own, and that is part of the tulip also.

It's more about understanding the nature, I told them. Keep the real flower in your head, how it's supposed to look, and look at it from different points of view. That's going to help you a lot. For that undercutting, I said to use the number 11 at 3 mm.
And if you don't understand what's going on, please come, take a picture, ask me, I said. I'll come to you and explain it on a personal level.
What is the second flower, the Venetian one?
A Venetian style one, a little different. It still has petals, and I said there are a couple of ways to work it, either five petals or a double layer.
One of the petals goes right underneath the stem, and at the top we make a couple of divisions. To make it clear, I drew it on a new layer. The center gets a plug cut right inside. Then come the divisions, which look like they grow, almost like an onion. They close like that.
I found a picture of the Venetian ones next. Three of them were single layer, and just the lower one was double, and a double layer takes much longer. See how uneven the edges are, I told the room. That is what we're after. More flowers in that style have their own Venetian flowers rosette course.
Is the tulip finished at the end of class 7?
Far from it. Most of what I did there I called preliminary, the preliminary idea of that tulip. Even the cleanup was preliminary.

Six classes later, in class 13, I looked the panel over again. I do like this guy, the tulip, I said, but I want to make sure it looks, I don't know, awesome. That was my goal.
Wikipedia says most of his own work is in lime wood, the genus Tilia. He used limewood for the carving and oak for the background, I told the room in class 10. The same article lists his work at Hampton Court Palace and Petworth House, and the V&A keeps a collection page on him.
Want to carve your own tulip, round and high on the panel? The full class videos open with tuition.
How it's done
- Outline the tulip first. Go round it with a 3/8 inch number 9 before anything else. It is the main idea, so it comes first.
- Lower the ground around it. Drop the area beside it a quarter inch or so, sloping down. Outline two more shapes too, while that tool is still in your hand.
- Roll it round with a number 2. One straight down pass, then roll the number 2 through many small chamfers. Keep a real flower in your head.
- Clear the two triangles. The nine opens them and a 3 mm number 11 gets further inside. Set the flute near 11 o'clock for the petal that lies on top.
- Spoon under the flipping petal. Excavate the spot with the nine, then switch to a spoon. Go carefully, with your thumb as a leverage point.
- Hollow and blend the petal. Two concaves that are not deep, made with the 14 mm seven, run out to the point. Blend away the ridge left in the middle using a number 2.
Frequently asked questions
Was Grinling Gibbons Dutch or English?
Both, in a sense. Wikipedia calls him Anglo-Dutch, with English parents and a birthplace in Rotterdam in 1648, and says he moved to England around 1667. My own guess about the tulip on his design comes from that Dutch side of him.
Which gouge rounds a carved tulip?
The number 2, which I called the flatter tool. After one straight down pass at the start, I rolled it through chamfer after chamfer until the tulip went round on all sides. Under one petal a number 3 can do the blending as well.
Why use a spoon gouge under a carved petal?
Under a petal that flips over you are working across the grain, and forcing a tool there will break it. A spoon lets you scoop out underneath a little at a time. Mine was a 7 mm number 11 veiner, and the students had a 10 millimeter number 9, I believed.
What to carve next